TorBox Setup Guide — The Best Automated Way to Enjoy your Media
I recently bought a Synology NAS, and I wanted to use this to store my important information as well as a way in which to store all of the media I had. I have come to the point where I had obtained about 6 external HDD’s, however they were rarely being used. I become lazy and never plug them into my computer as finding something I needed because a horribile experience. So they just sat there collecting dust.
I will not be going through the Synology NAS setup part of this Guide. This article will mainly be about DietPi, Docker, containers, and how everything connections together.
I want to document this, because I used to have this setup running on an external HDD only with a raspberry pi. I also encounted many issues with remote path mappings and permissions.
This is one of the many reasons why I have decided to write an article about it so that I have something to look back on in a few years time as well as when my setup breaks (which it does on an odd occasion) I have something to refer back to.
DietPi Setup
Download latest dietpi image: https://dietpi.com/#download (32 Bit)

Burn the image onto your SD Card
Mounting you NAS Shared Drives and External HDD
Now you will need to mount your NAS and your external HDD to DietPi
Type in the following command to get to the DriveManager setup

Select DriveManager

External HDD Mount
Plug your external HDD into the raspberryPi and Refresh the page and your external HDD will appear.

You will need to mount this drive, but you will need to ensure that the file format is ext4. If that is not the case you will you will to format the drive accordingly.
When naming the external drive ensure that the name of the is drive is/mnt/media-cache as temp downloads will be stored there.

NAS Drive Mount
Next you will need to setup your share drive from your NAS, assuming that it is plugged in and powered on.
Select the Add network drive option

Select Samba

Enter the IP Address of your NAS where you will be running your docker containers

Enter the name of your Share folder only, PlexMediaPi

Your shared NAS drive should have the following details

Both of the drives you have created should appear now on the DietPi-Drive Manager

Installing Docker and Webmin Packages in DietPi
Once you have installed the DietPi image onto your Raspberry Pi and mounted your shared drive from your NAS and external HDD, you need to install two packages from DietPi:
- Webmin
- Docker Build
You can do this by running the following command:

You will then be presented with this screen, and you will have to select “Software Optimized”

Make sure to select ID 115 and 162 with space bar

All you need to do now is select install to install the packages required for the setup
Installing Portainer and Docker Setup
Portainer is an application that is used to easily manager your docker containers. In this article, we will be making use of docker-compose and deploying a stack.
First you will to navigate to this link: https://documentation.portainer.io/v2.0/deploy/ceinstalldocker/
Follow the instructions to setup your Portainer Server Deployment

Make sure to run the commands as is, and do not change anything.
Once this has been completed you can now launch Portainer
<IP Adress>:9000
Login with admin and create a new password
When you launch Portainer for the first time, it will looks something like this

Click on local
When inside local you will be presented with your Dashboard.
Now that you have your Portainer running, you now need to create your stack.
Navigate to the hamburger menu on the left and select Stacks
Select Add stack
name your stack TorBox (or the name of your choice)
Paste your docker compose file inside the Web editor
Things to lookout for when setting up your docker-compose file:
- Environment variables for PGID and PUID is set to 1000 (root access)
- volume pathing variables are correct for your media cache drive and your share drive
- Download client volume is setup correctly
I have mine setup like this:
Download Client
/mnt/media-cache:/downloads ← This is where the downloads will go into on your external HDD which is connected to your rapsberry pi.
This is what you called the HDD
/mnt/media-cache
This is what Docker will see the drive as in the container
:/downloads
External HDD
/mnt/media-cache:/cache ← This is the external HDD you inserted into the raspberry pi.
This is what you called the HDD
/mnt/media-cache
This is what Docker will see the drive as in the container
:/cache
NAS Share Drive
/mnt/PlexMediaPi:/external ← This is the network share drive you mounted to the raspberry pi, which is currently connected to the NAS
This is what you called the network drive
/mnt/PlexMediaPi
This is what Docker will see the drive as in the container
:/external
Docker compose file can be found here: https://drive.google.com/drive/folders/10X5aJ_SkdL4vL8gw8tzhpzv84RPNcZnd?usp=sharing

Ensure Enable access control is toggled on and Administrator is selected and then click on Deploy this stack

Now that you have deployed your stack it show be showing under stacks

You do have the ability to edit your stack on the fly should you feel the need to do so by selecting the editor, but you would need to redeploy the stack to apply the changes.

If you navigate to containers, you should see the containers you have added to your docker-compose file running.

These are the docker containers I have decided to use in my setup:
- Deluge: https://hub.docker.com/r/linuxserver/deluge
- Radarr: https://hub.docker.com/r/linuxserver/radarr
- Sonarr: https://hub.docker.com/r/linuxserver/sonarr
- Jackett: https://hub.docker.com/r/linuxserver/jackett
Sonarr Setup
This is the client which will be used to download all of your favorite series
Navigate to Sonarr <IP Address>:8989
Lets setup Library Import
Click on Library Import and Choose another folder
In the File Browser select the external folder (This is the Share Drive on your NAS, but remember Docker see’s it as external)

Ensure that you select Series as this is what Sonarr is used for

Click OK and now your Root Folders should look like this

You can notice that your NAS drive is showing up correctly in Sonarr
Lets setup Media Management
Click on Media Management and Add Root Folder
In the File Browser select the external folder (This is the Share Drive on your NAS, but remember Docker see’s it as external)

Ensure that you select Series as this is what Sonarr is used for
Click OK and now your Root Folders should look like this

Lets setup Indexers
In Indexers Click on the plus icon and select Torznab under Torrents
Enter in your details accordingly, but there are two things we need to be aware of which I will mention in a bit.

When most people set up indexers in Sonarr (and Radarr) they would add all of the Indexers they have added into Jackett here, one by one. When Jackett goes down, it is really not a great experience to add every single indexer back into Sonarr or Radarr once you have fixed Jacket. So I have found a way around this.
Make sure your URL is setup like this:
URL: http://<IP Address>:9117/api/v2.0/indexers/all/results/torznab/
When you add the indexers individually, you would see that the only difference in the URL’s for each indexer is the name of the indexer.
Next thing to take care of is the API key. This can be found in Jacket. When you open Jackett you will see that the API key is at the top right hand corner of the Jackett website.

We will be adding our indexers within Jackett shortly.
Lets setup Download Clients and Remote Path Mappings
In Download Clients select the client of your choice, in this case we are using Deluge
Enter in your details accordingly, but remember the Host is the IP Address of where your containers are running. (raspberry pi)

Next, we will need to setup Remote Path Mappings, this is one of the things that confuse a lot of people, and is one of the reasons I’m writing this article.
Here, I will not just be saying, “enter your details accordingly” as I would like to do some explaining.
So when editing the remote path mapping we know that Host is the Ip Address of the raspberry pi.
Remote Path
In portainer in the docker compose file under the deluge container ther is a volume variable with the path
- /mnt/media-cache:/downloads ← this is the folder that deluge will have access to in docker
When deluge is installed (which I will get to later in the article) via docker it creates a complete folder automatically.
So that is why you have the folders setup as /downloads/complete/ in Remote Path
Local Path
In portainer in the docker compose file under the sonarr container there is a volume variable with the path
- /mnt/media-cache:/cache ← this is the folder that sonarr will access to in docker
When deluge is installed (which I will get to later in the article) via docker it creates a complete folder automatically.
So that is why you have the folders setup as /cache/complete/ in Local Path

Radarr Setup
This is the client which will be used to download all of your favorite movies.
The Radarr setup is pretty much the same as the Sonarr setup, but we will do this just for completeness.
Navigate to Radarr<IP Address>:7878
Lets setup Library Import
Click on Library Import and Choose another folder
In the File Browser select the external folder (This is the Share Drive on your NAS, but remember Docker see’s it as external)

Ensure that you select Movies as this is what Radarr is used for

Click OK and now your Root Folders should look like this
You can notice that your NAS drive is showing up correctly in Radarr
Lets setup Media Management
Click on Media Management and Add Root Folder
In the File Browser select the external folder (This is the Share Drive on your NAS, but remember Docker see’s it as external)

Ensure that you select Movies as this is what Sonarr is used for
Click OK and now your Root Folders should look like this

Lets setup Indexers
In Indexers Click on the plus icon and select Torznab under Torrents
Enter in your details accordingly, but there are two things we need to be aware of which I will mention in a bit.

When most people set up indexers in Radarr(and Sonarr) they would add all of the Indexers they have added into Jackett here, one by one. When Jackett goes down, it is really not a great experience to add every single indexer back into Sonarr or Radarr once you have fixed Jacket. So I have found a way around this.
Make sure your URL is setup like this:
URL: http://<IP Address>:9117/api/v2.0/indexers/all/results/torznab/
When you add the indexers individually, you would see that the only difference in the URL’s for each indexer is the name of the indexer.
Next thing to take care of is the API key. This can be found in Jacket. When you open Jackett you will see that the API key is at the top right hand corner of the Jackett website.
We will be adding our indexers within Jackett shortly.
Lets setup Download Clients and Remote Path Mappings
In Download Clients select the client of your choice, in this case we are using Deluge
Enter in your details accordingly, but remember the Host is the IP Address of where your containers are running. (raspberry pi)

Next, we will need to setup Remote Path Mappings, but as you can see it is pretty much the same as Radarr.
So when editing the remote path mapping we know that Host is the IP Address of the raspberry pi.
Remote Path
In portainer in the docker compose file under the deluge container ther is a volume variable with the path
- /mnt/media-cache:/downloads ← this is the folder that deluge will have access to in docker
When deluge is installed (which I will get to later in the article) via docker it creates a complete folder automatically.
So that is why you have the folders setup as /downloads/complete/ in Remote Path
This is the same path you will be putting into your Deluge Download Client when we set that up next.
Local Path
In portainer in the docker compose file under the sonarr container there is a volume variable with the path
- /mnt/media-cache:/cache ← this is the folder that sonarr will access to in docker
When deluge is installed (which I will get to later in the article) via docker it creates a complete folder automatically.
So that is why you have the folders setup as /cache/complete/ in Local Path
Jackett Setup
Jackett is an API used for searching torrents, so it provides us with an entire list of indexers we can use to search for our torrents.
I will not be going into much detail here as this fairly simple.
Navigate to Jackett<IP Address>:9117
Add all the indexers you would like to search from and add it to your Configured Indexers list.
When we configured the indexers in Radarr and Sonarr we used the “Copy Torznab Feed” and edited it accordingly.
This is what my list looks like currently:

Once you have added your list of Configured Indexers, go back to your Sonarr and Radarr Indexers and ensure that you test them to see if your connection is valid after adding your list of indexers in Jackett.
Deluge Download Client Setup
So there is not much setup to do when it comes to the Deluge Client, however there is still some configuration setup required here. The goodness is that we are almost complete.
Deluge is torrent client that will be used to download your torrents, and it basically be the middle man for all of your docker containers.
Navigate to Deluge<IP Address>:8112
Login with admin and password deluge (you can change this as soon as you’ve logged into deluge)
So there are only two things we would need to change inside deluge within the Preferences menu.
Click on Preferences and select Downloads and change the Download to path as follows:
/downloads/complete

Next navigate to Plugins and make sure Label is checked

After configuring those two settings, your Deluge is pretty much setup.
Installing Additional Plugins
AutoRemoverPlus plugin
I had a bit of a struggle trying to get this plugin to work, however I did find a helpful article.
One user on the forum posted the following:

All that is required is that you download the zip and extract it to retrieve the .egg file.

You will need to rename the file to AutoRemovePlus-0.6.2-py3.6.egg
Once you have done this you will place the egg file inside your plugins folder
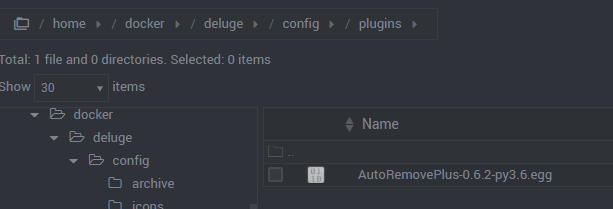
You will now need to restart the container which can be done via Portainer
The plugin should now appear within deluge under preferences

Webmin Setup
At this point, you must be thinking to yourself, “what now? will this ever end?”
Webmin is a a very powerful tool that provides you with a web GUI to manager a lot of things within your linux distro.
Webmin is what we will be using to set up scheduled back up’s of our configuration files as well as well checking our permissions and ownership of the files and folders that are important for our setup to be working.
We have installed Webmin in the very beginning of this article, so all we need to do is launch it to get started.
Docker Container Folders Ownership and Permissions
When we install DietPi it comes with two users, root and dietpi.
We want to make sure that our folders are all set to dietpi. When we install docker, it creates a folder under /home/docker. Both of these folders have the owner set to root which can be left as is.
One thing we need to do is change the ownership of all our containers to dietpi:dietpi.
This can be done by doing the following:
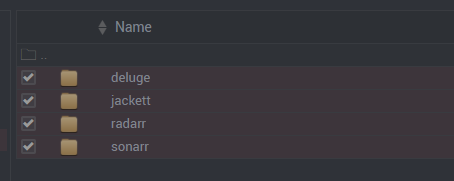
Select all of the docker container folders
Select Tools

Select on Change Ownership and change User name and Group name to dietpi (Make sure Recursive is selected) and click Change

Your container folders should look like this now

External HDD and NAS Share Drive Ownership and Permissions
If you remember earlier in the article we have already set this up, so here again we are just making sure that the ownership and permissions is setup correctly.
The folders we are going to be vetting here are the following:
- /mnt/media-cache ← the external HDD
- /mnt/PlexMediaPi ← the NAS share Drive
We want to as before make sure that the ownership is set to dietpi:dietpi which in our case it is as seen below.

media-cache folder
These two folders, incomplete and complete get created for us automatically when we install the docker-compose file (specifically deluge). What we want to check is the complete folder as this is where our temp downloads will be written to.
Make sure that the ownership of the complete folder is set to dietpi:dietpi

You can delete the incomplete folder, as we will not be using this folder, but I will just leave it there as it makes no difference.
media-cache file share
I will just add a quick tip to show you how to add your media-cache folder as a file share onto your windows machine so that you can view/add/delete/transfer files from one drive to another for whatever reason.
Simply login to Webmin and navigate to Samba WIndows FIle sharing under Servers

Click on Create a new file share
Add your Share name and the directory you would like to share and leave everything else as default

When you navigate to Tools>File Manager and look at the directory inside mnt which you want to share (mnt-cache) you will see the ownership is dietpi:dietpi
Go onto your windows machine and under “This PC” click on computer and create a new network drive.

Click on Browse and wait for the network drives to appear in the Browse for folder window.
Click on DIETPI and select the share folder you created in Webmin, in this case “Downloads” and click OK

Your Map Network Drive configuration should look something like this, just click on “Finish”

Your new mapped network drive should appear under “Devices and Drives” and you should be able to browse through the folders of the media-cache folder on your External HDD connected to your raspberry pi

You can now view/add/delete/transfer new files to your mapped network drive

PlexMediaPi folder
Here we just want to ensure that our Movies and Series folder ownership is set to dietpi:diet which in this case it is.

Backup docker config files
After putting in so much effort into our setup we want to make sure we have a back up of everything.
I have created a backup in two locations, one in PlexMediaPi and the other in media-cache.
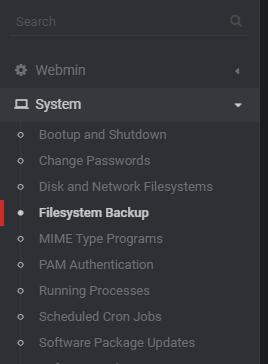
Within Webmin, navigate to System → Filesystem Backup

Select the directory you want to backup, in this case I want to backup my docker configurations folders.

You can now see the folder directory is now set

When you click on Add new backup of directory you will be presented with this screen
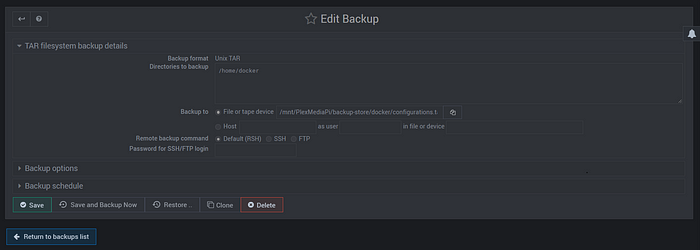
You can see above that I am setting the folder I want backed up to go to a specific backup-store folder I have created on my NAS share. When you add the path to be backed up you must add .tar at the end.
Now you will need to set the Backup schedule.
Here you can see that I have set my own times to be chosen within the scheduled backup option.
I have specifically set it to Everyday at 00:00 as seen below

You can will need to do the exact same ting for the media-cache folder.
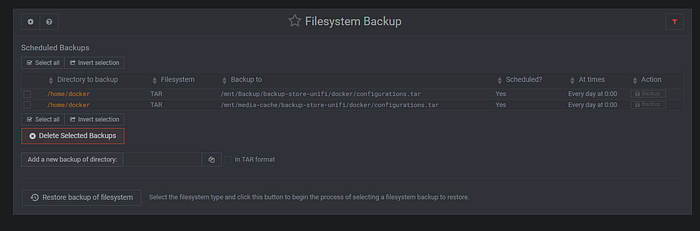
Once you have set this up, the scheduled backups should look like this on Webmin

The reason why I have decided to backup the docker folder on the PlexMediaPi NAS share is because when the folders get backed up on the NAS, they will then get uploaded to the cloud. That means I will have 3 sets of backups.
How to Restore from Backup
Find the backed up .tar file in your share Backup folder

Within Webmin naviagte to System>Filesystem Backup
Now you want to “Restore backup of filesystem”
Now you want to change a few things here

- Restore from file or device, point it to the file you want to restore onto the system.
- Restore to directory put “/”
- Only show files in backup make sure “No”
Click on restore Backup Now
From there start your containers and services
The great thing is, that this article will never have to be backed up.
I will soon be writing about the double NAT issue I encounted with Plex and how I was able to solve it. Stay tuned for that!